Building your fireplace mantel is a snap! Follow these 5 easy steps and you will be ready to enjoy your new mantel.
You will need the following tools and materials to build your mantel:
- Pencil
- 2 - 3/4" Lumber Nails
- 3 - Mounting Boards 3/4" x 2"
- 8 - Penny Finish Nails
- Drill
- Hammer
- Pencil
- Phillips Screw Driver
- Tape Measure
Step 1 - Build your Fireplace Mantel Surrounds
Carefully unpack the wood mantel from the box and inspect mantel for damage that may have occurred during shipment. If you find damage to any of the fireplace mantel kits, immediately report the damage to MantelsDirect.com.
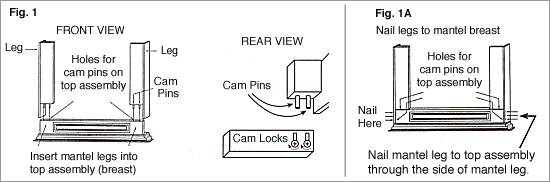
Set the mantel top assembly (breast) with the mantel shelf top on the floor. Unwrap the mantel legs and insert the leg pins into the top assembly holes as shown in Figure 1. Twist Cam Locks with a screwdriver to tighten legs to breast, then nail the legs to the mantel top assembly (breast) on each side with two or three number 8 finish nails. Make sure that the leg edge is flush with the mantel top assembly before nailing.
Helpful Hint: Drill pilot holes in each leg nailing position. This will insure that you don't damage the mantel when nailing the mantel together (see Mantel Plan Figure 1A).
Step 2 - Mark Mantel Position on Wall
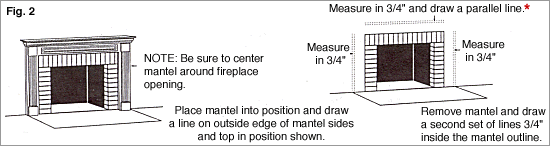
Once you've assembled the mantel legs to the mantel top assembly, turn the mantel over and place in position around the fireplace opening. Center the wood mantel surround and then draw the outline of the mantel top and sides on the wall. Remove the mantel and make a second set of lines 3/4" (1” for Georgetown and Newport, 1 1/2” for Somerset, Andover and all Prestige Collection mantels, and 1 3/4” for Regency and Portsmouth) inside the mantel outline below the shelf and 3/4” on each side (legs).
These lines are the location of the outside edge of the mounting boards. Mounting boards are not included with the mantel. See Mantel Plan Figure 2. Use 3/4" thick material, 1 x 2's or larger, for your mounting boards. The top mounting board should be one foot shorter than the length of the shelf.
Step 3 - Install Mounting Boards (mounting boards not included with the fireplace mantel kits)
Once you've marked the position on the mounting boards on the wall, place the mounting boards so that the top edge of the top mounting board and the outside edge of the side mounting boards are on the inside edge of the second line that was drawn. Secure the mounting boards to the wall by nailing through the mounting boards into the wall studs.
For the side mounting boards, if you are not lined up on a wall stud, cut the mounting board down to a small block, and secure block by nailing into the floor sill which is located at the bottom of the wall. See Figure 3.

Step 4 - Install the Mantel
Once your mounting boards are properly secured to the wall, you are ready to install your wood mantel. You may wish to paint or stain the mantel before final installation. Place the mantel in position over the mounting boards and nail into position using an 8 penny finish nail. Make sure that you keep the mantel tight against the wall when nailing into position.
Helpful Hint: You may want to drill pilot holes in each position on the mantel before nailing. This will insure that you don't damage the mantel when nailing into position. Where the wall and the mantel meet the wall may not be perfectly flat and some small gaps may appear. Simply fill the gaps with caulk and paint and finish the mantel appropriately. See Mantel Plan Figure 4.
Step 5 - Install Inside Scribe Molding
You should note that there will be a gap between the fireplace facing material (brick, tile, marble or slate) and the mantel legs. The mantel's inside scribe molding is used to cover the gap between the mantel and the facing material. Put the scribe molding into position and nail scribe molding to the mantel leg. Make sure you keep pressure on the leg when nailing to keep the leg from coming off the mounting brackets.
Helpful Hint: Drill pilot holes in each scribe piece for nail positions. See Mantel Plan Figure 5 above.
Go to our Learning Center to get more installation instructions and learn more about mantels and surrounds.