You have the option of installing your shelf alone (Option 1), shelf with corbels (Option 2), or shelf with corbels and arch (Option 3).

This mantel shelf comes with optional corbels as well as an optional arch base. If you decide to use the corbels, continue reading. If you choose not to use them, please proceed to Installation Using the Included Mounting Board.
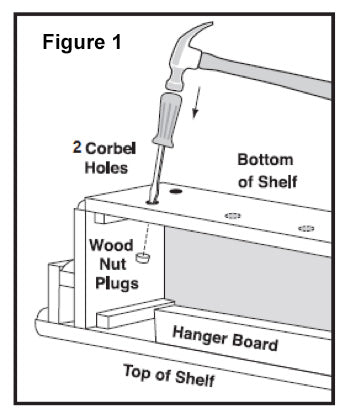
Installing the Corbels
- Step 1: Turn the shelf upside down on a soft surface. Tap out the wood nut plugs (4) using a flat head screw driver and hammer (Fig. 1). You will be left with 2 holes on each end of the shelf. If you will be attaching the center arch (see below), the side nut plugs on each corbel must also be tapped out.
- Step 2: Place the included washers onto the bolts.
- Step 3: With the shelf still upside down, line up the pre threaded inserts of the corbels with the holes in the bottom of the shelf (Fig. 2).
- Step 4: Insert the bolts through the holes in the bottom of the shelf and tighten into the threaded inserts.

Installing the Arch

Installation Using the Included Mounting Board
-
Step 1: With the shelf upside down on a soft surface, hold the mounting board in position on the mantel shelf. Measure from the bottom of the shelf to the bottom of the mounting board - Make note of this measurement, as you will use it in one moment.
Place the shelf on the wall above your fireplace or on the wall at the desired height. Level the shelf and draw a line on the wall along the bottom of the shelf. Remove the shelf and measure up the distance between the bottom of the shelf and mounting board that you noted earlier. Mark the line at several points to ensure a level mount. - Step 2: Line up the bottom of the mounting board with this new line and attach the mounting board to the wall in this position. Make sure the mounting board is level. If you are mounting the board on a standard drywall over stud construction, make sure you screw the mounting board into the wood studs (2x4's) for strength. When attaching the shelf to a brick surface you must use a masonry lag bolt. Drill three holes in the mortar joints of the brick in the desired position. Insert lag and attach mounting board with a bolt. Make sure the mounting board is secure to the wall (Fig. 5).

- Step 3: Install shelf onto the mounting board and slide down until the shelf is tight against the wall (Fig. 6). Once mounted, if the shelf doesn't seem to fit snugly to the wall, you may put a small shim of paper, cardboard, etc., to fill the gap where the 2 halves of the mounting board meet.

**The mounting board is only a suggested method. Your installer may also have additional methods for mounting your mantel or shelf. We suggest that pilot holes be drilled prior to inserting the appropriate hardware for final installation on the wall surface.
**Wood and MDF mantels are considered combustible materials. Heat clearances must be adhered to. Before installing, check your local building codes and the manufacturer's instructions for your specific fireplace insert or stove.